USER MANUAL-GARD PRO ULTRA 2+Updated 6 months ago
1. APP INSTALLATION
- Scan the QR code below or download the "GloryFit" app from application markets to install the linked app.
- Device requirements: iOS 9.0 or higher; Android 4.4 or higher, with support for bluetooth 5.3.
2. CONNECTING
a. Device connection:
- Open the app GloryFit. You will be asked for your email address, then press ''get captcha''. A ''captcha'' (5-digit code) will be sent by email. Fill it in at ''Captcha'' and press ''Log in'' Next, you will be asked for an information sheet about background activities, press ''Ignore'' here. Then fill in the requested information. You can go to the next screen by pressing ''>'' at the bottom. Once you have entered the information, click on ''Select Device'', click on the appropriate model and follow the instructions to connect.
b. Bluetooth connection:
- Bluetooth connection: After successful pairing, the APP will automatically save the Bluetooth address of the GARD PRO. And it will always remain connected during use. To activate various functions, you need to click on ''Device'' at the bottom of the GloryFit app. Here you can enable and disable all functions. Think Bluetooth calling, texting, Whatsapp, Facebook & Gmail.

c. Synchronized contacts:
While setting up the Gard Pro Ultra, you will be asked to provide access to use your contacts. You must allow this.
- Open the GloryFit app.
- Open ''Device.''
- Then press ''Bluetooth Call.''
- Follow the instructions at ''Sync Contacts''
Note: that you can add a maximum of 100 contacts to your list.
d. If the connection between the Gard Pro and your phone is broken, follow these steps:
- Go to your phone's settings and select Bluetooth.
- Find "Gard Pro Ultra 2+" and select forget this device.
- Restart your phone.
- Launch the GloryFit app and follow the connect instructions.
You could possibly choose to also completely uninstall the GloryFit app to redo entire installation process.
3. INSTRUCTIONS FOR QUICK USE
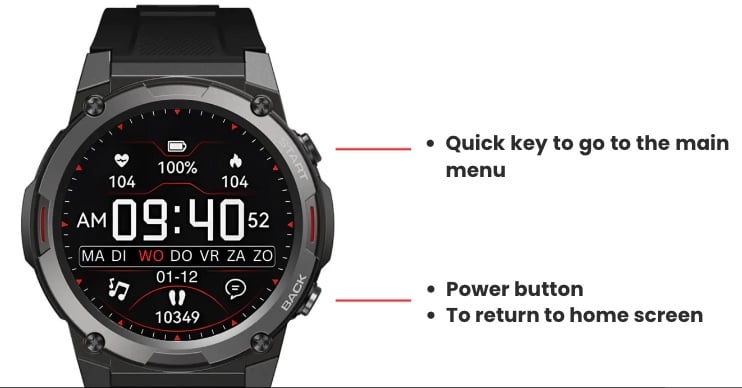
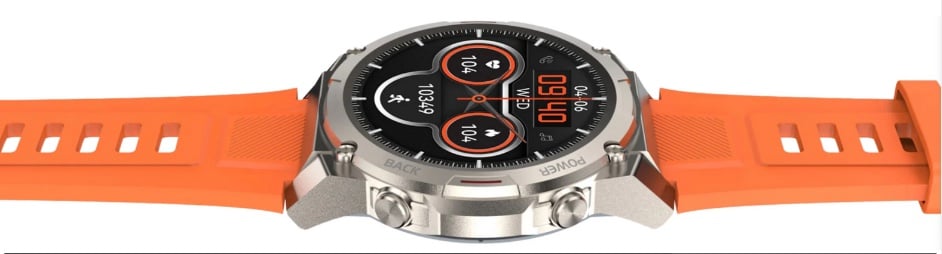
a. Turning on the Gard Pro:
- Make sure the Gard Pro is charged and press and hold the power button for 3 seconds. The Gard Pro will vibrate to indicate it is turned on.
b. Disable the Gard Pro:
- If you want to turn off the Gard Pro you need to hold down the power button for ± 3 seconds. Then the Gard Pro will ask you to turn off the device. Press the green check mark.
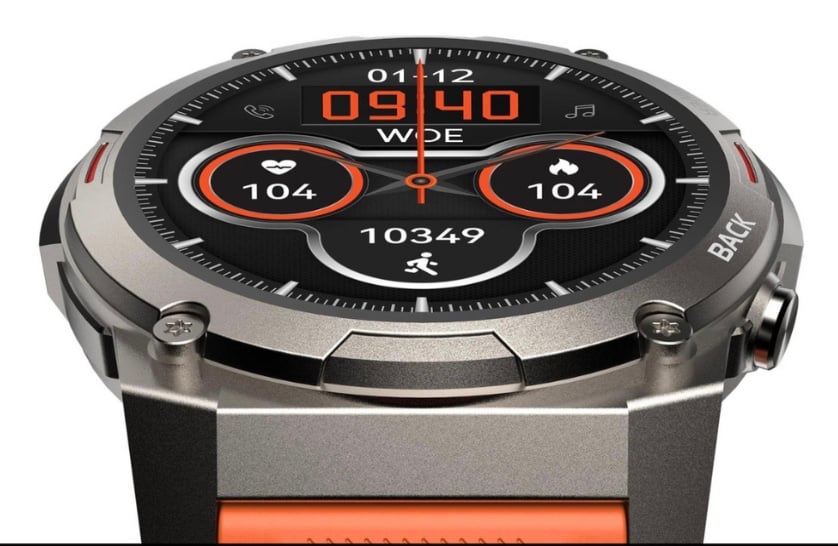
4. SCREEN ACTIVITY AND DISPLAY
Press either button on the right to light up the screen. If there is no further operation, the screen will automatically turn off after five seconds. You can adjust the ''Duration bright screen'' of the GARD PRO in the settings of your GARD PRO.
a. Adjust duration bright screen:
- From the home screen, swipe down.
- Select settings.
- Go to ‘’Bright screen display’’.
- Go to ‘’Duration bright screen’’ to select your desired time.
b. Adjust the brightness of your screen:
- From the home screen, swipe down.
- Select settings. (or press the brightness icon directly).
- Go to ‘’Bright screen display‘’.
- Go to ‘’Screen brightness‘’ to select your desired brightness. Adjust the screen brightness by tapping the ‘’-‘’ or ‘’+ ‘’button.
c. Automatically turn on screen when turning on:
- Open the GloryFit app.
- Go to "Device."
- Go to "Light up."
- Enable "Closed" by tapping the button on the right.
d. Always on function:
- From the home screen, swipe down.
- Select ‘’settings’’.
- Go to ‘’Bright screen display‘’.
- Go to ‘’Screen clock‘’. Then select how you want the ‘’Always on‘’ feature displayed.
NOTE: These functions require a lot of battery power. This will reduce the battery life considerably.
5. Dial - background
a. Changing your dial:
- At the bottom of the GloryFit app, go to ‘’Device‘’.
- Select ‘’Watch face‘’ and wait for all watch faces to load.
- Choose your favorite watch face to download it.
- Now the dial will appear on your GARD PRO.
- You also have a choice of 4 preset dials on your GARD PRO.
- Hold the home screen for ± 3 seconds and swipe right or left.
6. SPORTS - ACTIVITIES MONITORING
Choose from more than 100 sports activities.
a. Go to the sports interface:
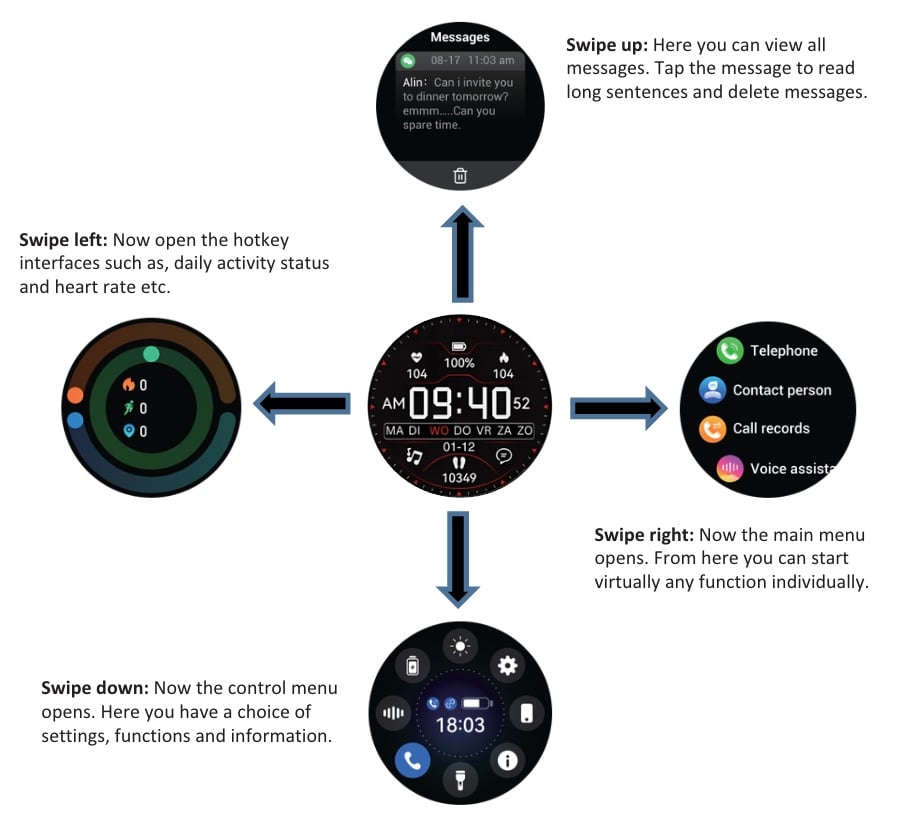
- From the home screen, swipe right and select ''Training''.
- Select a specific sports activity.
- After a three-second countdown, this sports activity starts.
- Swipe right to pause the monitoring.
- Click the red ''Stop'' button to end the sports activity.
TIP: To see your route in case of a walk, for example, you need to start the sports activity via the GloryFit app. You do this at the bottom of the app under ''Sports''. (You need to have the location feature on for this).
7. DAILY ACTIVITIES STATUS
a. Pedometer, distance and calorie status view:
- Access the activity status, by swiping left once on the home screen, to view the current number of calorie consumption, steps, and distance traveled. Distance and calories are calculated and displayed based on current steps and height and weight set in the app. By having location feature on, you ensure that measurements are more accurate.
b. Adjust your daily step goal as follows:
- At the bottom of the GloryFit app, go to ''Profile.''
- Select the top bar to enter/change a profile picture, name and your information.
- To change your step goal press ''Goal'' at ''Profile''.
8. CALLING AND APP MESSAGES
a. Turn calling on/off on the Gard Pro:
- At the bottom of the GloryFit app, go to ''Device''.
- Select ''Phone.''
- Press both bars on the right side.
- When both bars turn green, you should be able to make calls with the Gard Pro.
b. Enable text message notifications via vibration:
- At the bottom of the GloryFit app, go to ''Device''.
- Select ''App.''
- Then press the individual apps you want to receive notifications from on your GARD PRO.
- When the bar turns green your message will receive notifications.
c. Disable call notifications:
- From the home screen, swipe down and select the moon icon.
- Select ''✓'' to turn silent mode on or off.
- When the moon icon is red silent mode is in.
Note: If this does not work go to your phone's settings and find the app GloryFit. Then check that you have given permission to receive messages. Also check per app if the 'show preview' is set to 'always'.
9. HEART RATE MONITORING
By default, the Gard Pro continuously monitors heart rate for 24 hours. You can turn this feature on or off in the GloryFit app. To use the heart rate monitor on the Gard Pro Ultra, follow these steps:
- Make sure the Gard Pro Ultra is worn securely and in contact with your wrist.
- Swipe from the main interface to the heart rate interface.
- The Gard Pro Ultra will automatically begin measuring your heart rate.
- Wait for the measurement to complete. The heart rate reading will be displayed on the screen.
10. BLOOD PRESSURE MONITOR
a. Automatic blood pressure measurement:
Switch to the blood pressure interface to start automatic blood pressure measurement.
- Make sure the Gard Pro Ultra is worn securely on the wrist with no gaps.
- From the home screen, swipe right once and select ''Blood Pressure.''
- The Gard Pro Ultra will automatically begin measuring your blood pressure.
- Wait for the measurement to complete. The blood pressure reading will be displayed on the screen.
11. BLOOD OXYGEN MONITOR
a. Automatic blood oxygenation measurement:
- Make sure the Gard Pro Ultra is worn securely on the wrist with no gaps.
- From the home screen, swipe right.
- Select ‘’Bo’’ and the blood oxygen measurement will start automatically. The blood oxygen reading is displayed on the screen.
NOTE: For accurate results, make sure the GARD PRO is worn securely and has good contact with the wrist. Avoid movement during the measurement.
12. WEATHER FORECAST
a. Weather and temperature conditions:
- Switch to the weather interface to view weather and temperature. Weather conditions are automatically updated 24 hours a day.
13. MUSIC CONTROL
a. Music playback controls:
- After successfully connecting the paired app - "GloryFit," the Gard Pro Ultra can control music playback functions such as pause, previous song and next song when the phone is playing music.
14. SLEEP FOLLOWING
a. Sleep quality control:
- From the home screen, swipe right.
- Select ‘’Sleep‘’ to come out to the sleep interface.
- On this screen, you can swipe up to view the data. The data can also be viewed in the GloryFit app under ‘’Sleep‘’.
NOTE: Put the GARD PRO on the sleep interface when you go to sleep.
15. BODY TEMPERATURE
a. Automatic measurement of body temperature:
Switch to the body temperature interface to automatically measure body temperature. The measurement interval can be set in the app. The default alarm threshold is 37.3°C, but you can also change this setting in the app.
b. Change the unit of measurement:
- Open the GloryFit app.
- Go to "Device."
- Then go to "Body temperature settings."
- Select "Unit."
- Here you can choose a unit you want to use.
c. Adjust temperature settings:
- Open the GloryFit app.
- Go to "Device."
- Then go to "Body temperature settings" .
- Enable "Automatic setting" - this feature sets your watch to detect your temperature at set times.
16. ALARM CLOCK SETTINGS
a. Managing alarm clocks:
You can add an alarm so the Gard Pro keeps you informed. You can set up to 6 groups of alarms.
b. Set an alarm clock:
- From the home screen, swipe right and select ''Alarm Clock.''
- Then press the green + button.
- Here you get the choice to set different alarm clocks.
- You can also install alarm clocks in the GloryFit app.
17. BREATHING TRAINING
a. Automatic respiratory rate measurement:
- From the home screen, swipe right and select ''Breathe training.''
- Here you get the choice to set different sessions.
- Choose from the time and speed of breathing frequencies.
- Then press ''Start button'' to start the session.
18. SEDENTARY REMINDER
a. Setting motion inhibitors:
- At the bottom of the GloryFit app, go to ''Device''.
- Select ''Sedentary reminder.''
- When the bar turns green, the function is on.
- Now you can set a start and end time and a do not disturb time.
19. FINDING MY PHONE
a. The Find My Phone feature:
- From the home screen, swipe right and select ''Find phone.''
- Next, your phone will play a ringtone.
- Now you have found your phone.
20. SOS-CONTACT
a. Setting up your personal SOS contact:
- At the bottom of the GloryFit app, go to ''Device''.
- Select ''SOS Contact.''
- Then press ''Add+.''
- Now you can select one or more contacts.
- When you now press ''SOS'', a call will be made directly to your set SOS contact.
IMPORTANT INFORMATION
a. Inaccurate measurements:
Usually, inaccurate readings occur due to poor contact between the GARD PRO's sensor and the wrist. So make sure there is full contact between the sensor and the wrist during measurements. Soiled, damp or hair density can affect the measurements.
b. Inaccurate sleep data:
Sleep monitoring simulates natural sleep and wake times, so wearing it correctly is important. Errors can occur if you start wearing the GARD PRO too late at night. No sleep data is monitored during the day. Standard period for sleep monitoring is from 9:30 p.m. to 12:00 a.m. the next day.
c. Bluetooth problems:
Restart the GARD PRO and reconnect to the GloryFit app. Is this not working?
- Close the GloryFit app completely.
- Turn off your cell phone.
- Give your GARD PRO a reset by going to ''Settings'' and then pressing ''Reset''.
- Restart your cell phone and ensure a proper connection between the GloryFit app and your GARD PRO.
Note: You could possibly choose to also completely uninstall the GloryFit app to redo entire installation process.
Warranty
With normal use of the GARD PRO, our warranty is valid for a period of two years from the date of purchase for manufacturing defects.
During this period, if the product does not function as advertised or is found to be defective, we (Gard Pro) will repair or replace the product at no additional cost to you.
This warranty does not cover damage caused by misuse, water, fall or general improper handling of the smartwatch. Examples include:
- Errors caused by disassembly or modification of the GARD PRO.
- Any man-made damage or errors caused by third parties.
To claim this warranty, you must present proof of purchase and contact us by email for instructions on how to proceed. This warranty is non-transferable and applies only to the original purchaser of the product.
Insurance GARDCARE+
Protect your Gard Pro smartwatch with our GARDCARE+ insurance! With our insurance you are covered against damages and even mishaps such as water or screen damage. That's why we offer fast and hassle-free claims services.
So every GARD PRO smartwatch comes with a standard 2-year warranty.
WITH GARDCARE+
You extend your coverage from your GardCare+ purchase date and have unlimited repairs against accidental damage.